
How to Clean a Restaurant Fryer?
You are in the right place if you’re wondering, “How to clean a restaurant fryer?” This article will answer this pivotal question and delve into several other crucial aspects of fryer maintenance.
Our guide is designed to be your one-stop solution, brimming with essential insights yet often overlooked.
How to Clean a Restaurant Fryer?
How to Clean a Restaurant Fryer? The Process Involves:
- Cooling down and draining the oil.
- Cleaning fryer accessories.
- Scraping off debris.
- Conducting a thorough ‘boil out’.
- Finishing with meticulous rinsing and drying.
Sounds straightforward. But there’s much more to it.
In this article, we will unfold each step in detail, revealing tips and tricks that even seasoned chefs might need to learn.
You’ll learn the ‘how’ and the ‘why’ behind each action, ensuring your fryer remains in top-notch condition.
Whether you’re a new restaurant owner, a young chef, or simply keen to deepen your kitchen knowledge, this guide promises to keep you engaged with its easy-to-understand, practical advice.
Stay tuned as we dive deeper into the world of restaurant fryer cleaning, where each step is a crucial puzzle piece in ensuring the longevity of your equipment and the safety of your food.
Why Regular Cleaning is a Must
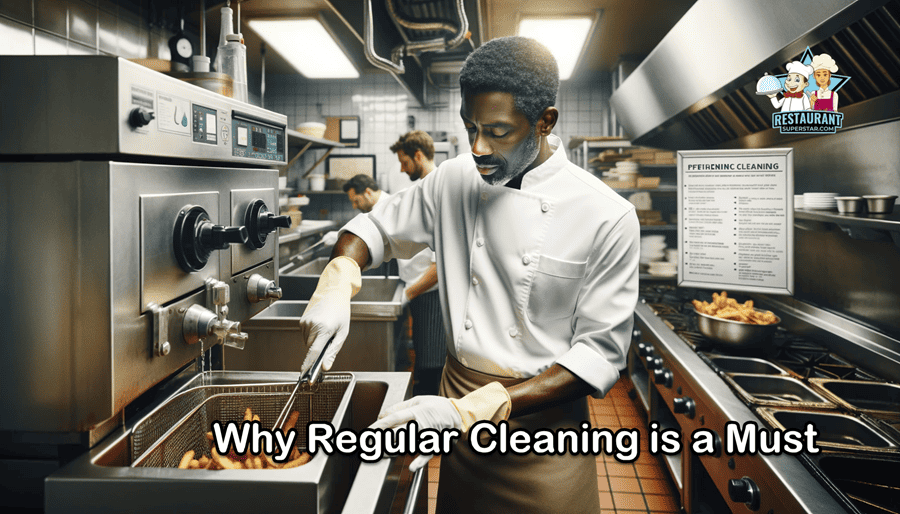
- Food Quality: Have you ever noticed how old oil can affect food taste? Regular cleaning ensures every batch of fries or chicken wings tastes just as amazing as expected.
- Safety First: A dirty fryer isn’t just about bad food; it’s a safety hazard. Grease build-up can lead to fires – a risk no one should take.
- Longevity of Equipment: Your fryer needs TLC to run smoothly like any machine. Regular cleaning extends its life, saving you money in the long run.
Cleaning Process at a Glance
Let’s break it down into simple steps:
- Cooling Down: Safety first! Let that fryer cool before you dive in.
- Draining Oil: Get rid of the old oil – but remember, the environment matters, so dispose of it responsibly.
- Scrub-a-dub-dub: It’s not just about the oil tank; those baskets and accessories need attention, too.
- The Deep Clean: This is where the magic happens. We’ll talk about a ‘boil out’ process – it sounds fancy but pretty straightforward.
- Rinse and Dry: These are the last steps, but just as crucial.
Safety Precautions and Preparations
Before we dive into the nitty-gritty of cleaning your restaurant fryer, let’s chat about staying safe. Trust me, this isn’t just about keeping your fryer sparkling; it’s about keeping you out of harm’s way.
Safety Gear
- Gloves: We’re not just talking about any gloves. Get some heavy-duty ones that can handle heat and grease.
- Apron: A good apron is like a superhero’s cape in the kitchen – it protects you from splatters and spills.
- Safety Glasses: Oil can splatter, and cleaning agents can splash. Your eyes are precious – guard them well!
Tools of the Trade
Here’s a quick checklist of what you’ll need. Think of it as your cleaning toolkit:
- Heat-Resistant Container: For safely handling hot oil.
- Cleaning Brushes: Get a variety, each for a specific task. There’s no such thing as a one-brush-fits-all here.
- Scraper: To tackle those stubborn bits of food and grease.
- Sponges: For the gentler, yet thorough, wipe-downs.
- Clean Rags: Lint-free is the way to go. They’re perfect for drying and polishing.
- Dish Soap: A kitchen classic. Choose a grease-fighting formula for extra power.
- Deep Fryer Cleaner: Specialized cleaners can make a huge difference. Check your fryer’s manual for recommendations.
- White Vinegar (Optional): Great for a natural finishing touch. It’s like the cherry on top of your cleaning sundae.
Remember, having the right gear and tools makes cleaning smoother and safer. So, before scrubbing away, ensure you’re fully equipped. In the next section, we’ll learn how to use these tools effectively.
Step 1: Cleaning Process: Cool Down and Drain the Oil
Let’s roll up our sleeves and jump into the heart of the matter: the cleaning process. The first step in our “How to Clean a Restaurant Fryer?” guide is cooling down and draining the oil. It sounds simple, but there’s a right way to do it to ensure safety and efficiency.
Let it Cool
- Patience is Key: After a long frying day, your fryer needs a break. Please turn it off and give it time to cool down. This could take a few hours, so plan this step accordingly.
- No Rushing: Never attempt to clean or drain oil from a hot fryer. Not only is it dangerous, but you could also damage your equipment.
Drain the Oil
- Suit Up: Remember those gloves and apron? Now’s the time to put them on.
- Choose the Right Container: Grab that heat-resistant container you gathered earlier. It’s going to hold the used oil.
- Draining Time: If your fryer has a stopper, gently open it to let the oil flow into the container. No spigot? You might have to scoop it out manually (be extra careful here).
- Be Environment-Friendly: Once you’ve collected the oil, don’t just throw it in the trash. Used cooking oil can often be recycled or disposed of safely. Check with your local waste management services for guidelines.
That’s it for the cooling and draining phase! By following these steps, you’re taking care of your fryer and prioritizing safety and environmental responsibility. In the next part, we’ll dive into cleaning and scrubbing.
Step 2: Remove and Clean Accessories
Now that our fryer has cooled and the oil is safely stowed away let’s focus on the more minor yet crucial components: the baskets and any removable parts. Cleaning these accessories is as important as cleaning the fryer itself. Let’s break it down:
Removing Accessories
- Take Them Out: Carefully remove the fryer baskets and any other detachable parts. This could include filters, lids, or other elements that come off quickly.
- Inspect as You Go: As you remove these parts, give them a quick once-over. Look for any damage or excessive wear that might need addressing.
Washing Time
- Prep Your Sink: Fill a large sink or basin with hot, soapy water. The hotter the water, the better it cuts through that greasy residue.
- Scrub-a-dub: Give each part a thorough scrubbing using a non-abrasive scrub brush or sponge. Pay special attention to corners and crevices where grease and food particles love to hide.
- Rinse Well: Rinse each piece with clean, hot water after scrubbing. You want to ensure all the soap and loosened grime are entirely gone.
- Dry and Inspect: Dry each part with a clean, lint-free cloth. As you dry, inspect each piece again. This is your chance to ensure everything is spotless and in good working order.
A Little Extra for Tough Spots
- Baking soda or a commercial degreaser can do wonders if you encounter stubborn grease spots. Just apply, scrub, and rinse thoroughly.
And just like that, your fryer accessories should be sparkling clean and ready for action! In the next section, we’ll tackle the fryer, getting into the deep clean that will keep your kitchen running smoothly and safely.
Step 3: Initial Clean-up – Tackling Loose Debris
After your fryer accessories are set aside and cleaned, we must return to the fryer itself. The initial clean-up is all about removing the loose debris hanging around. This step is super important because it sets the stage for a more thorough cleaning later. Let’s dive in:
Getting Started with Scraping
- The Right Tool: Grab a metal spatula or a fryer scraper. These tools handle the tricky, caked-on bits without damaging the fryer’s surface.
- Gentle Yet Firm: Start scraping the fryer’s sides, bottom, and corners. Be firm enough to remove debris but gentle enough to avoid scratching the surface.
- All About Angles: Sometimes, changing the angle of your tool can make a big difference in removing stubborn grime.
Tips for Effective Scraping
- Take Your Time: This isn’t a race. The more thorough you are now, the easier the rest of the cleaning process will be.
- Reach All Areas: Don’t forget those hard-to-reach spots, like the corners and under the heating elements (if accessible).
- Safety First: Even though the fryer is excellent, you should wear gloves to protect your hands from sharp edges and residual grease.
Clearing Out the Debris
Once you’ve loosened all the debris:
- Scoop It Out: Use a slotted spoon or a similar tool to remove the larger debris from the fryer.
- Dispose Properly: Put the debris in a trash bin. Avoid washing it down the drain, as this can cause plumbing issues.
And there you have it! Your fryer is now free of all the loose, unwanted bits and ready for the deep cleaning that’s up next. These simple steps ensure a smoother, more effective cleaning process that keeps your fryer in top condition.
Step 4: Boiling Out – The Deep Clean
Now that the initial clean-up is done, it’s time for the boiling out process. This is where we get to business, ensuring your fryer is clean and sanitized. Boiling out is crucial in the “how to clean a restaurant fryer” process, so let’s get it right!
Filling the Fryer with Water
- Measure Right: Fill the fryer with water, but do not fill the fryer evenly. Aim to reach just a few inches below the fryer’s top edge.
- Temperature Matters: Start with cool or lukewarm water. This helps to distribute the cleaning solution evenly. You’ll add it next.
Adding the Cleaning Solution
- Choose Wisely: Use a commercial deep fryer cleaner, following the recommendations in your fryer’s manual. These cleaners are formulated to break down grease and grime without damaging your fryer.
- Follow Instructions: Add the recommended amount of cleaner to the water. Different cleaners have different concentration levels, so it’s crucial to follow the specific instructions on the label.
The Boiling Process
- Heat It: Slowly bring the water to a simmer. Avoid a rolling boil, as it can be too harsh on the fryer and might cause splashing.
- Timing is Everything: Maintain a gentle simmer for 15-20 minutes. This allows the cleaning solution to work its magic.
Some Handy Tips
- Watchful Eye: Keep an eye on the fryer during this process. You don’t want the water to boil over or get too hot.
- Event Coverage: Occasionally, Stir the water to ensure even cleaning and prevent any hot spots from forming.
Cooling and Draining
- Cool Down: After boiling, turn off the fryer and cool the water to a safe temperature. This might take some time, so be patient.
- Drain Away: Drain the water from the fryer once it’s fantastic. Be sure to dispose of this water properly, containing grease and cleaning chemicals.
And voilà! You’ve just completed one of the most effective cleaning techniques in the fryer maintenance playbook.
The boiling out process ensures deep cleaning, essential for hygiene and functionality.
Step 5: Deep Cleaning and Rinsing – The Finishing Touches
Great job on completing the boiling out! Your fryer is already looking better, but we’re still going. Now, it’s time for the deep cleaning and rinsing phase, a crucial step to ensure every last bit of grime and cleaning solution is gone.
Let’s walk through this together:
Post-Boil Clean-Up
- Cooling Down: Once you’ve completed the boiling out process, turn off the heat and let the water cool. This might take a while, but it’s essential for safety.
- Drain the Water: Drain it from the fryer to a safe temperature after it cools. This water will contain grease and cleaning agent residues, so dispose of it properly.
The Scrub Down
- Suit Up Again: Put those gloves back on – safety first!
- Scrubbing Time: Using a non-abrasive scrub brush or sponge, start scrubbing the interior of the fryer. Pay special attention to any areas with stubborn grime.
- Get into the Corners: Use a smaller brush or an old toothbrush to get into the nooks and crannies of the fryer. These areas often harbor hidden grease and debris.
Rinsing: Not Just Once, but Multiple Times
- First Rinse: Rinse the interior with hot water and a cleaning solution to remove loosened debris.
- Repeat the Rinse: It’s crucial to rinse several times to ensure all the cleaner and grime are entirely gone. You don’t want any residues left behind.
- Check as You Go: After each rinse, inspect the interior. Look for any spots you might have missed or areas that need more scrubbing.
Drying Out
- Wipe It Down: Once satisfied with the cleaning, use a clean, lint-free cloth to dry the fryer’s inside thoroughly.
- Air It Out: Leave the fryer open to air dry altogether. This helps to eliminate any remaining moisture.
And there you have it – a deep-cleaned, rinsed, and dried fryer ready for another cooking day! These steps are crucial in maintaining the hygiene and efficiency of your restaurant’s fryer.
Next, we’ll look at some final touches to ensure your fryer is clean and in optimal condition for use.
Step 6: Final Touches – Perfecting Your Fryer’s Cleanliness
Congratulations! You’re almost finished with our “How to Clean a Restaurant Fryer” journey. Now, it’s time for those final touches to enhance cleanliness and ensure your fryer is in top working condition. Let’s wrap this up with some pro tips:
Optional Vinegar Cleaning Step
- Mix a Solution: If you want to go the extra mile, mix a solution of equal parts water and white vinegar. This natural combo works wonders to eliminate lingering grease and neutralize odors.
- Wipe Down: Dip a clean cloth in the vinegar solution and wipe down the interior of the fryer. Be thorough but gentle.
- Rinse Again: After the vinegar treatment, give the fryer one final rinse with clean water to remove any vinegar residue.
Drying – The Key to Rust Prevention
- Thorough Drying: Use clean, dry, lint-free cloths to wipe down the inside of the fryer. Removing all moisture is crucial to prevent rust.
- Air Dry: If time permits, leave the fryer open to air dry completely. This helps to ensure that every nook and cranny is moisture-free.
Reassembling Your Fryer
- Put It Back Together: Now that everything is clean and dry, reassemble the fryer. Replace all the parts you removed earlier, including the baskets and filters.
- Double-Check: As you reassemble, make sure everything fits snugly and securely. Loose parts can be a safety hazard.
Inspection Time
- Look for Damage: Take a moment to inspect your fryer for any signs of damage or wear and tear. This could be anything from cracks to malfunctioning parts.
- Plan for Repairs: If you spot any issues, plan to have them repaired before using the fryer again. Regular maintenance is critical to longevity and safety.
And there you have it! Your fryer is not just clean; it’s sanitized, reassembled, inspected, and ready to fry up some delicious food. Regular cleaning and maintenance like this will ensure your fryer serves you well for many future meals.
Additional Tips and Maintenance: Keeping Your Fryer in Prime Condition
Great job on getting through the cleaning process! Here are some additional tips and maintenance practices to keep your fryer in the best shape possible.
These nuggets of wisdom are convenient for new restaurant owners and young chefs looking to master the art of kitchen upkeep.
Follow the Fryer’s Manual
- Manufacturer’s Advice: Refer to your fryer’s manual for specific cleaning and maintenance recommendations. Manufacturers often provide guidelines tailored to the model you have.
- Use Recommended Products: The manual usually lists recommended cleaning products that are safe and effective for your specific fryer.
Dispose of Cleaning Chemicals Responsibly
- Environmental Concerns: Proper disposal of used cleaning chemicals is not just a good practice; it’s a responsibility. These chemicals can be harmful to the environment if not disposed of correctly.
- Follow Local Regulations: Check with your local waste management services for guidelines on safely disposing of cleaning chemicals.
Regular Cleaning Schedule
- Frequency Matters: A regular cleaning schedule is essential for heavily used fryers. This could mean a deep clean every few weeks, depending on usage.
- Post-Service Routine: Consider a lighter cleaning routine after each service day. This can prevent build-up and make deep cleanings easier.
Avoid Abrasive Cleaners
- Be Gentle: Abrasive cleaners or scouring pads can scratch and damage the surface of your fryer. This affects its appearance and can lead to rust and degradation.
- Choose Wisely: Opt for non-abrasive sponges and brushes, and use gentle yet effective cleaning solutions.
By following these additional tips and maintaining a regular cleaning schedule, you’ll extend the life of your fryer and ensure it continues to perform at its best. Remember, a well-maintained fryer is crucial for food quality, kitchen safety, and efficient operation.
Frequently Asked Questions
How Do You Clean an Oil Fryer in a Restaurant?
To clean an oil fryer in a restaurant, you must regularly perform a “boil-out” cleaning. This involves removing the old oil from the fryer, filling it with water, and using a commercial deep fryer cleaning solution. The next step is to boil this mixture inside the fryer, which helps to effectively remove any accumulated grime and food particles stuck to the fryer’s surfaces.
How Do You Remove Caked-on Grease from a Deep Fryer?
Removing caked-on grease from a deep fryer involves a simple yet effective method. First, fill the fryer with water up to the maximum oil line and add a few drops of dish soap. Turn on the fryer to heat the water to a boil. Combining heat and dish soap will help loosen and dissolve the grease. After allowing the water to boil for several minutes, please turn off the fryer and let the water cool before disposing of it.
How Do You Clean a Commercial Kitchen Fryer?
Cleaning a commercial kitchen fryer can be broken down into five easy steps:
- Turn Off the Power and Cool the Oil: Ensure the fryer is turned off and allow the oil to cool down.
- Remove the Oil and Scrape Out the Interior: Drain out the used oil and use a scraper to remove any loose debris from the fryer’s interior.
- Cover Soiled Areas With Water and Cleaner: Fill the fryer with water and add an appropriate cleaning solution.
- Turn On the Heater and Boil the Water. Heat the water in the fryer to help loosen the grime.
- Cool Down, Dispose of Water, and Rinse Thoroughly: After boiling, let the water cool, dispose of it, and rinse the fryer thoroughly with clean water.
How Often Should You Clean a Commercial Deep Fryer?
A commercial deep fryer should be cleaned at least once a week. However, the frequency of cleaning may need to be increased depending on the usage and the type of food being cooked.
Regular cleaning is crucial to maintain the fryer’s performance and ensure food safety in any commercial kitchen setting.
Conclusion
And that’s a wrap on our comprehensive guide to “How to Clean a Restaurant Fryer.” As we conclude, let’s take a moment to recap the key takeaways and reflect on why this process isn’t just a chore but a crucial aspect of running a successful kitchen.
The Importance of Regular and Thorough Cleaning
- Food Quality and Safety: Regular cleaning ensures that the food you serve is delicious and safe to eat. A clean fryer means no unwanted flavors or health hazards.
- Longevity of Equipment: By thoroughly cleaning your fryer, you’re not just keeping it shiny but extending its lifespan, ensuring it serves you well for years.
- Safety in the Kitchen: A well-maintained fryer reduces the risk of kitchen fires and accidents, making it a safer environment for everyone.
Final Tips for a Stellar Kitchen
- Stick to the Schedule: Make fryer cleaning a regular part of your kitchen routine. The more consistent you are, the easier and more effective the process becomes.
- Train Your Team: Ensure all kitchen staff are trained in proper fryer maintenance. A team effort goes a long way in maintaining a clean and efficient kitchen.
- Stay Updated: Keep abreast of the latest cleaning techniques and safety guidelines. The culinary world is constantly evolving, and so should your cleaning practices.
Remember, a clean fryer isn’t just about appearance; it’s about pride in your work, commitment to quality, and dedication to safety. By following the steps and tips outlined in this guide, you’re setting yourself up for success in the buzzing world of the culinary arts.
Jeff Smith is a Restaurant Consultant with over 20 years of hospitality experience ranging from server to owner and general manager. He focuses on Restaurant POS technology as well as restaurant marketing. Check out our world-famous restaurant resources page for a comprehensive offering of hand-picked resources and tools to help your business. You can also check out some of our other restaurant business articles.